
Today's theme at
Gingersnaps is 'Gothic Elements' - having read the description I may have made a slight misinterpretation of said theme as I went with Hallowe'en. However, I am happy with my creation - it's not very me but that's what I love about it! I've had this Grungeboard skull lurking about forever wondering what on earth I might do with it. I also finally got to try my Rock Candy Crackle Paint too to age and weather the skull.
Here's how I made it:
Ingredients:
Tim Holtz Masks: Haunted
Tim Holtz stamps: Slight Alterations
Inks: Dusty Concord Distress Ink; Stampin’ Up black ink; Memento Smoky Grey ink
Grungeboard shapes (skull)
White acrylic paint
Distress Crackle Paint: Rock Candy
Chipboard
Book pages
Thickers letters – chipboard
Black card
Die cut spiders
Thread
Scrap of ribbon
1 Cut chipboard into a coffin shape and paste book paper (I tore it to add texture) over the chipboard. Trim.
2 Place the masks down and ink over with Dusty Concord. Add black in places around the edges. Stamp the scratches stamp from the Tim Holtz set with black ink. Remove the masks.
3 Tone down the white of the spider webs with a touch of grey ink.
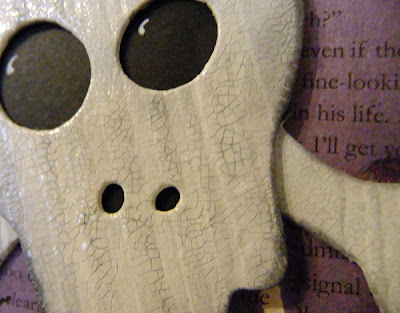
4 Paint the Grungeboard skull with white paint (I cut it into pieces so I could layer the bones behind the skull for dimension). When dry ink the edges and then paint with Rock Candy Crackle Paint. Allow to dry then rub grey Memento ink over to highlight the cracks. Add black card to the back to fill the eye and nose sockets.
5 Similarly paint/ink chipboard letters to spell ‘boo’. Add on a scrap of torn black card.
6 Finish with spider die cuts or plastic toy spiders, hanging one from the bottom on grey thread. Add a loop of black ribbon as a hanging.

 This is a birthday card I made a while ago for my good friend Ruth. The stamps are PaperArtsy Hot Picks and Inkadinkado. The background is simply inked with a blending tool. The design is inspired by a project Leandra Franich did for Craft Stamper magazine.
