Sunday 27 March 2016

Project Skinzapfel!


Andy Skinner and Tracy Weinzapfel are hosting a joint challenge on their Facebook groups (Andy Skinner and Friends and Tracy Weinzapfel Studios Mixed Media), daring their followers to create a piece of art that combines both of their styles in some way.


This is my entry and below is a brief step out of how I created it. I was influenced by one of Tracy's favourite colour palettes - blues and greens with a red heart and I added bubble wrap printing and a inspirational words also in homage to Tracy. I've used Andy's techniques on my piece - including stamping into modelling paste and mega crackle.

Most of the products are of course from DecoArt and here's what I used:

  • DecoArt Media Fluid Acrylics: Pyrrole Red, Cadmium Orange Hue, Cobalt Teal Hue, Cobalt Turquoise Hue, Primary Cyan, Green Gold, Quinacridone Burnt Orange, Metallic Gold, Payne's Grey, Blue Green Light
  • DecoArt Media: Modelling Paste, Crackle Paint, Ultra Matte Varnish
  • DecoArt Weathered Wood
  • DecoArt Metallic Lustre: Silver Spark
  • Stampendous Andy Skinner stamps: Toxic
  • Stampendous Natalie Kalbach stamps: Marks
  • Rubber Dance stamps by Katy Leitch: Affirmations

1 For the base of my journal page I used a piece of canvas on a roll. I cut it larger than needed and lightly marked the eventual size with pencil before painting the background with orange and red paints.

2 Once dry I added Weathered Wood - and then when that was dry a layer of Crackle Paint. This is Andy's Mega Crackle technique and there's a video here.

3 When the magic cracks appear add some washes of watered down paint in blue and green tones, mixing lightly. Then coat with a layer of varnish to prevent any damage to the crackle (the Mega Crackle is a bit more delicate than using the Crackle Paint normally).

4 Place a stencil over the background and fill with modelling paste using a palette knife. While the modelling paste is still wet, press a stamp spritzed with water into it repeatedly to create texture.

5 When the paste is dry, paint over it with Pyrrole Red paint. Add a wash of Payne's Grey and then highlight the texture with Metallic Lustre, applying it lightly with your finger. Outline the heart with Stabilo All pencil in black and blend with water to create a shadow effect.

6 Alter some metal cogs to make them look like copper with verdigris effect. To do this mix Gold Metallic with Quin Burnt Orange to make copper paint and apply to the cogs. Add some Blue Green Light in places with a sponge, then add a wash of Payne's Grey and a bit more copper. Repeat until happy.

To finish: Stamp with bubble wrap and Cobalt Turquoise Hue paint. Add some stamping in black and white to add detail. Finish the page with some wording and a little Metallic Lustre to the edges.

I am really pleased with my piece - hope you like it!

Katy x

Thursday 24 March 2016

Stitches Makes

Just a few more of my makes for Grafix/Talens that I did for Stitches. All made with Grafix Monoprinting Plates and Stencil Film, and Amsterdam paints.

Tag using watered down actylics with a stencil and a Grafix Printable Film vintage image and Rub-onz homemade rub-on.

Monoprint with acrylics, bubble wrap texture and stamping, and finished with an Apple Blossom die cut leaf.

Monoprint with die cut stencil (Tim Holtz), acrylic paints. Stencil of heart made with stencil film, filled with transparent acrylic and over-stamped. The white gel pen is a Sakura Gelly Roll.

I have some more to share as well but no time to blog!
Katy x

Monday 21 March 2016

Dancing Dragonflies


I love mixed media but I also love a clean and simple card too. Sometimes when a stamp is as nice as this one from Visible Image you just want to let it speak for itself.

I simply stamped the dragonflies and sentiment with black Archival Ink and then coloured them with Distress Inks and a water brush - I used Peacock Feathers and Twisted Citron - love that combo!


And it's as (very) simple as that but I think this is a really effective and pretty card, especially if you are in a hurry!

Katy x


Monday 14 March 2016

From Junk to Journal


Today I am sharing a journal page made quite literally from rubbish - the sheet of paper from the bottom of my 'spray & splat' box that I use for messy techniques. I thought the paper was just too pretty to throw away so I worked over it to create this art journal page. I am really pleased with how it turned out!

Product details:
DecoArt Media Fluid Acrylics
Stamps - Donna Downey, Prima/Finnabair
Stencils - The Crafter's Workshop, Tim Holtz
Die - Memory Box

Here's how I created it:

1 This is what the scrap paper from my spray box looked liked before I started work. I glued it to a piece of mixed media paper to make it more sturdy.

2 I added some details with a stencil (TCW) and some Green Gold DecoArt paint.

3 I added further stenciling (Tim Holtz) with white modelling paste.

4 While still wet, I sprinkled the modelling paste with silver embossng powder.

5 Heat set the embossing powder (if the modelling paste is still a bit wet you'll get bubbling like you see here - I think this is cool but if you want it smooth allow the paste to completely dry before heating). Add some more stencil (TCW) detail with black gesso.

6 Stamp the foam bird (Donna Downey) with Cadmium Orange Hue paint (DecoArt).

7 Use Primary Yellow and Pyrole Red through a TCW stencil to add detail to the bird (it doesn't matter if you go over the edges as it's being cut out).

8 At this point I decided the silver embossing was too in your face so I toned it down with a bit of white gesso and Cerulean Blue paint.

9 I added some stamping with Prima stamps and black ink, outlining the circles roughly with silver calligraphy pen (Sakura). I also added washi tape.

10 I added some more details using a pen top and credit card dipped in white paint. I added die cut flowers (Memory Box) too. For the bird I created a shadow with a Stabilo All pencil under where he would be placed before sticking him down. I also outlined the bird with white gel pen and finished the page with a sentiment (Prima).

I think it's a success - which means I am likely to throw away even less stuff!!! My husband will be delighted.............

Katy x

Sunday 13 March 2016

Monoprinted Card


Sharing a quick card I made as part of my demo for Stitches today. It's got a monoprinted background using the Grafix Impress Monoprinting Plates

.
I didn't take any step pictures of this process but the background is created with a stencil and corrugated card to make the lines. It's finished with stamps from Wendy Vecchi.

Hoping to film some more monoprinting videos soon so keep your eyes peeled!

See you soon,
Katy

Wednesday 9 March 2016

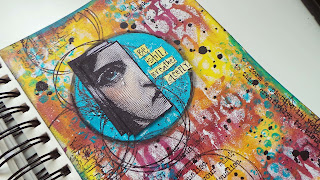
A Tribute to Frida


Today I am sharing a journal page I made in tribute to the wonderful artist Frida Kahlo. The stamp of Frida is from Stampotique and I love it :). This page nearly ended up in the bin - and I am still not completely sure about it - but I am glad I persevered with it nonetheless. It took me a long time to learn the lesson that with mixed media it often looks awful before it starts to come together!


I didn't take an process pics this time but this is how I created it:

1 Randomly smear various colours of DecoArt fluid acrylics onto a piece of mixed media paper.

2 Add stenciling with white paint - I stencilled the pattern and then flipped it and printed with what was left of the paint.

3 Add black splats using a DecoArt Permanent Mister, purple stamping with bubble wrap and a bottle top, black stamping (eye stamp) and some lines made in white paint with the edge of a credit card.

4 Stamp Frida onto acetate and cut out in a square. Add a bit of gesso to the page behind where her face will be so it's not obscured then staple the acetate in place. Doodle a border with black permanent marker,

5 Stamp the Finnabair paintbrush stamp (which includes the words), add a bit of colour and stick down. Embellish with a heart and some sequin waste.

Out of my comfort zone with this one so I'd love to know what you think!

See you very soon I hope,
Katy x

Monday 7 March 2016

Dragonfly Monolith for Visible Image


For my DT post today I've been playing with the new MDF monoliths from Visible Image again in combination with this lovely new dragonfly stamp.

Here's how I made it:

1 Add a layer of crackle paint (I used DecoArt) to the monolith, in a few places only. When dry, paint over with washes of acrylic paint (I used DecoArt Media Fluid Acrylics). When working steps one and two make sure you leave room to stamp the sentiment cleanly.

2 Add some stencilling with modeling paste to give your background additional texture.

3 Add additional stamping in blue and yellow with a bottle lid and some bubble wrap.

4 Stamp the sentiment in black the wording around the edges, also in black,


5 Stamp the dragonfly twice, cut out and colour with paint washes. Stamp the body oneot the background - this is so the legs can show. Layer the cut out images on top.


6 To finish simply embellish with painted flowers and die cut leaves.

Thanks for stopping by today! You can find the Visible Image shop here.

Katy x

Live in the Moment

Imagine Dream Inspire


Saturday 5 March 2016

Flower Canvas Tut


I've got a video tut for you today using spray inks to create a floral canvas. Have you got half an hour to spare this weekend? Then you can make a canvas just like this. It's a really quick, really easy project but I think the end result is so pretty.


Ad usual my video is brief and to the point. Hopefully all the info you need is there but if you have any questions don't hesitate to leave them below or contact me via Facebook.

Happy spraying!
Katy

Friday 4 March 2016

Crafts Beautiful article


Very chuffed to have had an article in the March issue of Crafts Beautiful mag :). I created a couple of cards which didn't make it into the feature so am sharing them here. All the pieces were made with DecoArt Media fluid acrylics and crackle paint. The paint is applied as a wash over the crackle and also used to colour the flowers, leaves and butterfly.


The colours are my absolute faves in the fluid acrylics line - Green Gold and Cobalt Teal Hue - lush together! The crackle is subtle but so pretty. I really enjoyed making these and it's still a thrill seeing my work in print. I'm in the next issue too - exciting!!!!!


Thanks for indulging over excited little me!
Katy x

Thursday 3 March 2016

Bee Tag for ColourArte


Sharing my tutorial on the ColourArte blog - using Twinkling H20s and a very old but fun technique...

The stamps used are from Stampotique (bee) and Visible Image (words).

Please pop over - I'd love you to leave me a comment if you've enjoyed it :). Feedback is always helpful!

Katy x

Wednesday 2 March 2016

Be Still......


I'm back in my journal again - I never thought I'd get into this journaling lark but I like the free and experimental feel. Not sure my journal is really a journal - more of a messy playground! For this piece I worked with yummy DecoArt Media Fluid Acrylics to make a layered background.

I'm going for a couple of challenges with this one:
-Andy Skinner's blog challenge - theme Bold & Bright. I'm not sure if this qualifies completely but it's VERY bright for me! Do love my muted tones...
and
-That's Crafty Circle It challenge
and
-Love to Create Anything Mixed Media


I took a few pics along the way so here's a how-to for the background (I got a bit excitable when I got to the stamping and forgot to take pics!). I think it's always fun to see how journal pages build from something that looks like a dog's dinner to something with a discernible composition!

Start by adding a light spray of water and some Hansa Yellow Light paint to a piece of mixed media paper (or other heavy paper that will take a few layers of wet media). Blend out with your fingers (or a paintbrush if you don't like mucky hands).

Add some blobs of Quinacridone Violet and blend with your fingers, adding a little touch more water (you don't want too much water, just enough to help the paint move). They'd actually blend better over a layer of gesso but I was being lazy! This is the 'dog's dinner' stage I referred to!

Continue adding and blending small blobs of paint - blend vertically as well as horizontally. The colours form a beautiful burnt orange where they mix. Place a stencil (Andy Skinner for DecoArt) over the dry paint and pounce white gesso through it with a lightly loaded sponge. 

Add some stamping using bubble wrap (am literally addicted to this technique) with Cobalt Teal Hue paint. Spread a blob of paint thinly onto a palette with your finger then dab the bubble into it before pressing to your page.

Use a DecoArt Media permanent black mister to add splats - to do this take the tube out and flick it onto the background. Unlike water-based sprays you get a really solid black with this product.

Place a stencil over the piece (this one is homemade using Stencil Film from Grafix - the film lets you make your own sturdy reusable stencils - I cut it with a docrafts Xcut die). Sponge white gesso then Cobalt Teal Hue paint through it. When dry add some stamping with white gesso.

To finish up I added lots of stamping with stamps by Cherry Pie, Visible Image, Stampotique, Crescendoh and Carabelle Studios. All the stamping is done in black Archival. I lightly tinted the girl with watercolours before adding her.

I hope you enjoyed my foray into brighter hues!
Katy x